Quick Answer
Dryer vents should be professionally cleaned every 12 months, or every 6 months for heavy use (4+ loads weekly). Lint accumulation causes 15,000 home fires annually in North America, resulting in $200+ million in property damage. Professional cleaning costs $120-$250 in Toronto. Warning signs include longer drying times, burning smell, excessive heat, and lint visible around door seal. Clean immediately if you notice any fire risk indicators.
At-a-Glance: Dryer Vent Cleaning
Dryer vent cleaning is one of the most critical yet overlooked home safety tasks. According to the U.S. Fire Administration, failure to clean dryer vents is the leading cause of dryer fires, accounting for 34% of residential dryer fires. In Toronto, where older homes often have long, complex vent configurations, the risk increases significantly. This comprehensive guide covers everything you need to know about dryer vent cleaning, fire prevention, warning signs, DIY versus professional cleaning, and Toronto-specific considerations.
Why Dryer Vent Cleaning Matters: Fire Statistics & Safety
Understanding the severity of dryer vent fire risk helps homeowners prioritize this critical maintenance task.
Dryer Fire Statistics
According to the National Fire Protection Association (NFPA) and U.S. Fire Administration:
- 15,970 home fires started by dryers annually in the United States
- 13 deaths per year attributed to dryer fires
- 444 injuries annually from dryer fires
- $238 million in property damage each year
- 34% caused by failure to clean - the #1 cause of dryer fires
- Peak fire season: January - winter months see 21% more dryer fires
How Dryer Fires Start
Dryer fires develop through a specific progression:
- Lint accumulation: Dryer exhaust contains lint particles (fabric fibers) that bypass the lint trap
- Vent restriction: Lint builds up in exhaust duct, reducing airflow by 30-80%
- Heat buildup: Restricted airflow causes heat to accumulate inside dryer cabinet and vent
- Ignition temperature reached: Lint ignites at 440-450°F; dryer heating elements reach 135°F normally but can exceed 500°F when airflow is blocked
- Fire spreads: Burning lint travels through vent system, can ignite wall framing, insulation, and adjacent materials
Toronto Home Fire Risk Factors
Toronto homes face elevated dryer fire risk due to:
- Older construction: Pre-1980 homes often have non-metal ductwork (plastic, foil) which is more flammable
- Long vent runs: Multi-story homes and townhouses frequently have 15-25 foot vent runs with multiple bends
- Shared vent systems: Some older apartment buildings use shared venting that's rarely cleaned
- Basement installations: Common in Toronto, requiring longer vertical vent runs that accumulate more lint
- Winter usage increase: Toronto winters drive 40% higher dryer usage (fewer outdoor drying options)
10 Warning Signs Your Dryer Vent Needs Immediate Cleaning
Recognizing these warning signs can prevent fire and costly repairs:
Critical Warning Signs (Clean Immediately)
- Burning smell during operation
- Indicates lint accumulation near heating element or exhaust duct
- Lint may be smoldering or close to ignition temperature
- Action: Stop using dryer, unplug, schedule emergency cleaning
- Excessive heat on dryer exterior
- Top or sides of dryer unusually hot to touch
- Indicates airflow blockage causing heat buildup
- Normal: slightly warm. Concerning: too hot to touch for 3+ seconds
- Clothes extremely hot at cycle end
- Clothing temperature over 150°F (too hot to handle immediately)
- Heat isn't exhausting properly, circulating back into drum
- Can damage fabrics and indicates dangerous heat levels
- Visible smoke or steam from vent
- Smoke indicates burning lint or imminent fire
- Excessive steam indicates complete vent blockage
- Action: Turn off dryer, unplug, evacuate area, call fire department if smoke continues
Urgent Warning Signs (Clean Within 1 Week)
- Clothes taking 2-3 cycles to dry
- Normal cycle: 45-60 minutes. Blocked vent: 90-180 minutes
- Indicates 50-75% airflow restriction
- Wastes $15-$25 monthly in extra electricity
- Lint accumulation around dryer door seal
- Lint escaping through door indicates severe vent blockage
- Air pressure forces lint backward into laundry room
- Creates respiratory hazard and indicates fire risk
- No or weak airflow from exterior vent
- Test: Hold tissue paper near exterior vent hood during cycle
- Normal: tissue should blow outward strongly
- Blocked: little to no movement, indicates 70-90% restriction
- Laundry room becomes hot and humid during use
- Moisture and heat escaping into room instead of exhausting outside
- Can cause mold growth, wall damage, and fire hazard
- Normal: laundry room slightly warmer. Concerning: 10-15°F temperature increase
Maintenance-Level Signs (Schedule Cleaning)
- More than 12 months since last cleaning
- Standard recommendation: annual professional cleaning
- Heavy use (4+ loads weekly): clean every 6 months
- Even without symptoms, lint buildup occurs gradually
- Musty smell on dried clothing
- Indicates moisture retention from poor venting
- Allows mold and mildew growth in vent system
- Clothing isn't completely drying despite appearing dry
How Often Should You Clean Your Dryer Vent?
Cleaning frequency depends on usage, vent configuration, and household factors:
| Usage Level | Loads Per Week | Cleaning Frequency | Toronto Consideration |
|---|---|---|---|
| Light Use | 1-2 loads | Every 18-24 months | Inspect annually, clean if restricted |
| Moderate Use | 3-4 loads | Every 12 months | Standard recommendation for most homes |
| Heavy Use | 5-7 loads | Every 6 months | Large families, winter usage increase |
| Very Heavy Use | 8+ loads | Every 3-4 months | Daycare, rental properties, large households |
Factors That Require More Frequent Cleaning
- Long vent runs: Vents over 15 feet require more frequent cleaning (every 6-9 months)
- Multiple bends/elbows: Each 90-degree turn reduces airflow 5-10%, accumulates lint faster
- Flexible ductwork: Ribbed interior traps more lint than smooth metal ducts
- Pet owners: Pet hair increases lint production 30-50%
- Older dryers: Less efficient lint traps allow more exhaust lint
- Vertical venting: Upward venting fights gravity, accumulates lint faster
Professional Cleaning vs DIY: What You Need to Know
Professional Cleaning
Cost: $120-$250 in Toronto
Best For:
- Long vent runs (15+ feet)
- Multi-story installations
- Complex routing with multiple bends
- Inaccessible vents (behind walls, in ceilings)
- Severe blockages or fire risk conditions
- Annual comprehensive maintenance
Professional Services Include:
- Complete vent system inspection
- Rotary brush cleaning (removes 95-98% of lint)
- High-powered vacuum extraction
- Exterior vent hood cleaning/repair
- Dryer cabinet internal cleaning
- Airflow testing before and after
- Safety inspection of ductwork
- Written report and recommendations
DIY Cleaning
Cost: $25-$60 (equipment)
Best For:
- Short, straight vent runs (under 8 feet)
- Easy access to entire vent path
- Between-professional-cleaning maintenance
- Budget-conscious homeowners
- Simple, single-story configurations
DIY Limitations:
- Cannot reach full length of long vents
- Basic brush kits remove only 60-75% of lint
- Difficult to clean bends and vertical sections
- No professional airflow testing
- Risk of disconnecting ducts if forced
- Can't identify structural issues
What Professional Cleaning Costs in Toronto (2025)
| Service Level | What's Included | Cost Range | Recommended For |
|---|---|---|---|
| Basic Cleaning | Vent duct cleaning, basic inspection | $120-$160 | Short vents, annual maintenance |
| Standard Cleaning | Complete vent cleaning, dryer interior, exterior hood | $160-$200 | Most Toronto homes, standard service |
| Comprehensive Cleaning | Full system, airflow testing, detailed report, repairs | $200-$250 | Long/complex vents, fire risk concerns |
| Emergency Service | Same-day, critical blockage removal | $250-$350 | Fire risk, burning smell, complete blockage |
DIY Dryer Vent Cleaning: Step-by-Step Guide

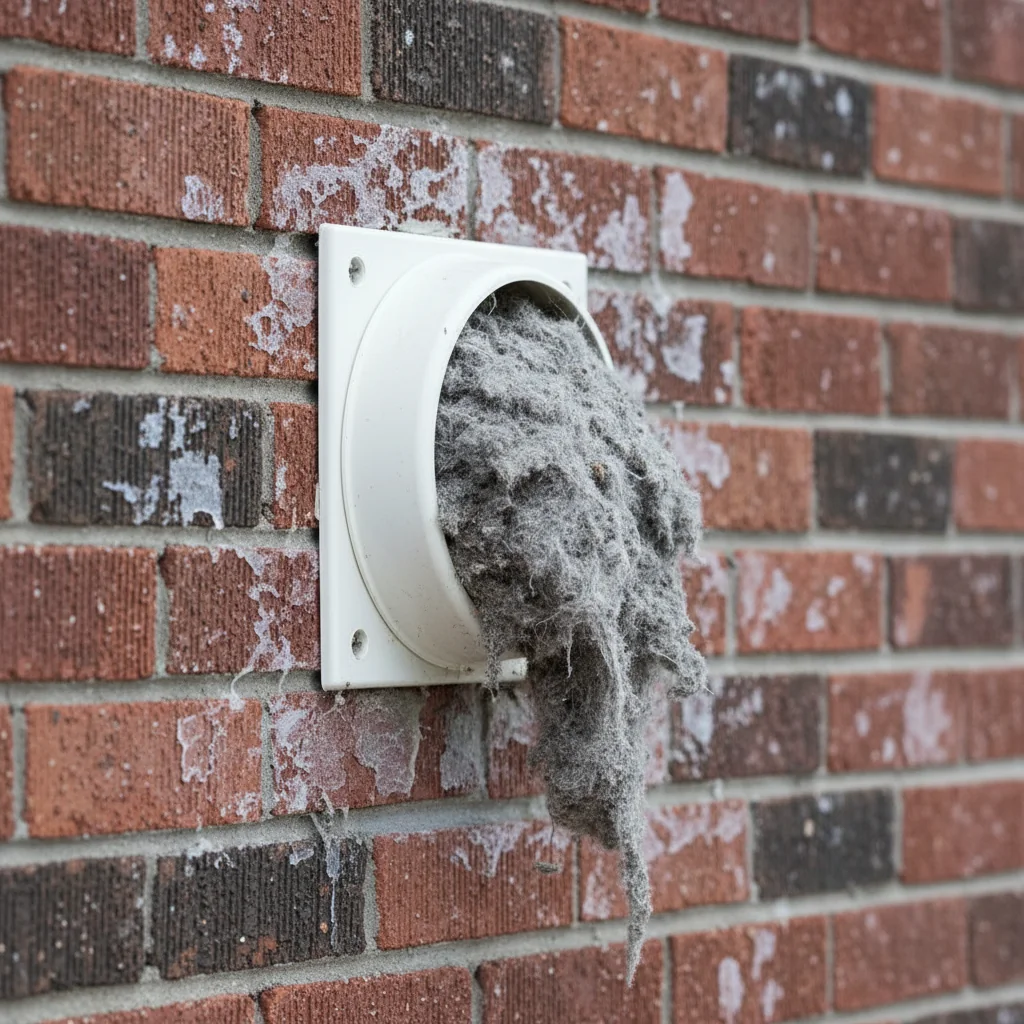
Massive lint accumulation like this causes 15,000 dryer fires annually in North America. Professional cleaning removes 95-98% of dangerous lint buildup, preventing fire hazards and improving dryer efficiency by 40-60%.
For homeowners with simple vent configurations, DIY cleaning is feasible with proper tools and techniques:
Tools and Materials Needed
- Dryer vent cleaning kit ($25-$45) - includes flexible rods and brush head
- Vacuum with hose attachment - preferably shop vac
- Screwdriver set - for disconnecting vent connections
- Work gloves and dust mask - lint creates significant dust
- Flashlight - inspect vent interior
- Duct tape - for re-securing connections (use metal foil tape, not cloth duct tape)
Step 1: Preparation (10 minutes)
- Unplug dryer from electrical outlet (gas dryers: turn off gas supply valve)
- Pull dryer away from wall (at least 3 feet for working room)
- Locate vent connection at dryer exhaust port (usually 4-inch diameter round port on back)
- Note vent configuration before disconnecting anything
Step 2: Disconnect Vent System (5 minutes)
- Loosen clamp or disconnect vent duct from dryer exhaust port
- Remove vent duct carefully (expect lint to fall out)
- Go outside and remove exterior vent hood cover if accessible
Step 3: Initial Lint Removal (15 minutes)
- Use vacuum to remove loose lint from both ends of vent duct
- Remove lint from dryer exhaust port opening
- Vacuum exterior vent opening
- Clean lint trap and housing thoroughly
Step 4: Deep Cleaning with Brush Kit (30 minutes)
- Assemble cleaning kit brush head onto first rod section
- Insert brush into vent duct from dryer end
- Push forward with rotating motion (clockwise turns)
- Add rod sections as you advance through vent
- Work brush through entire vent length to exterior
- Pull brush back slowly, removing dislodged lint
- Repeat process 2-3 times for thorough cleaning
Step 5: Final Cleaning and Inspection (15 minutes)
- Vacuum all accessible areas again
- Inspect vent duct for damage (holes, disconnections, crushing)
- Check that exterior vent hood flap opens and closes freely
- Verify no lint remains visible in duct
Step 6: Reassembly (10 minutes)
- Reconnect vent duct to dryer exhaust port
- Secure with metal clamp (not plastic zip ties)
- Ensure duct is straight with no kinks or crushing
- Replace exterior vent hood cover
- Push dryer back into position (maintain 4-6 inches from wall)
- Reconnect power (or turn gas back on)
Step 7: Testing (10 minutes)
- Run dryer on air-dry or low heat for 10 minutes
- Check exterior vent - strong airflow should be evident
- Verify dryer isn't overheating
- Confirm no burning smell
- Test normal drying cycle with load of towels
What Professional Dryer Vent Cleaning Involves
Understanding the professional process helps you evaluate service quality and ensure comprehensive cleaning:
Professional Cleaning Process
- Initial Assessment (10 minutes)
- Technician inspects vent configuration and length
- Tests current airflow with measuring device
- Documents baseline performance
- Identifies access points and potential issues
- System Preparation (5 minutes)
- Disconnect dryer from vent system
- Set up protective covers to contain debris
- Position high-powered vacuum equipment
- Interior Dryer Cleaning (15 minutes)
- Remove and clean lint trap housing completely
- Vacuum dryer cabinet interior
- Clean heating element area and blower housing
- Remove accumulated lint from all internal components
- Vent Duct Deep Cleaning (30-40 minutes)
- Insert rotary brush system into vent from both ends
- Professional equipment reaches 30+ feet with power rotation
- Simultaneous vacuum extraction removes dislodged lint
- Multiple passes ensure 95-98% lint removal
- Special attention to bends and vertical sections
- Exterior Vent Service (10 minutes)
- Clean exterior vent hood and screen
- Remove bird nests, leaves, debris
- Verify flap operation (should close when dryer off)
- Repair or replace damaged hood if necessary
- System Inspection (10 minutes)
- Inspect entire vent run for damage or separation
- Check for proper duct material (rigid metal recommended)
- Verify correct installation (no dips or sags creating lint traps)
- Measure vent run length and calculate expected airflow
- Final Testing and Documentation (10 minutes)
- Reconnect all components securely
- Test dryer operation
- Measure post-cleaning airflow (should improve 200-300%)
- Provide written report with recommendations
- Schedule next cleaning recommendation
Comprehensive Dryer Fire Prevention Checklist
Beyond vent cleaning, these practices minimize fire risk:
Before Each Load
- Clean lint trap completely - remove all visible lint
- Check pockets for lighters, matches, flammable items
- Don't overload dryer - clothes need air circulation
- Ensure clothing is appropriate for machine drying
During Drying
- Don't leave dryer running when away from home
- Don't run dryer overnight while sleeping
- Stop cycle immediately if burning smell occurs
- Avoid over-drying - use moisture sensor if available
Weekly Maintenance
- Clean lint trap housing with vacuum
- Wipe down dryer drum interior
- Check for lint accumulation around dryer base
- Inspect vent connection at dryer for tightness
Monthly Maintenance
- Wash lint trap with soap and water (removes fabric softener residue that reduces airflow)
- Check exterior vent hood - clear any obstructions
- Verify strong airflow during operation
- Clean area behind and beneath dryer
Annual Professional Service
- Complete vent system cleaning
- Dryer internal inspection and cleaning
- Electrical connection inspection
- Belt and roller condition check
- Heating element inspection
Toronto-Specific Dryer Vent Considerations
Common Toronto Home Configurations
Basement to Roof Vent (Most Challenging)
- Common in 2-3 story homes
- Vent runs 20-35 feet vertically
- Requires professional cleaning every 6-12 months
- Lint accumulates rapidly in vertical sections
- Cost: $180-$250 due to complexity
Basement to Exterior Wall
- Horizontal run through foundation
- Typically 10-20 feet
- Easier access for cleaning
- Watch for frost buildup in winter (Toronto winters create condensation)
- Annual cleaning sufficient for most homes
Main Floor to Exterior Wall
- Shortest, simplest configuration
- Usually 4-8 feet
- Easiest to clean (DIY feasible)
- Lowest fire risk due to short run
Toronto Building Code Requirements
Toronto building code mandates for dryer venting:
- Rigid metal ductwork required - flexible foil or plastic ducts prohibited
- Maximum length: 25 feet (reduced 2.5 feet for each 90-degree bend)
- 4-inch diameter minimum for residential dryers
- Exhaust must terminate outdoors - attic, crawlspace, or garage venting prohibited
- Vent hood with backdraft damper required at exterior termination
Frequently Asked Questions
How much does dryer vent cleaning cost in Toronto?
Professional dryer vent cleaning in Toronto costs $120-$250 depending on vent length, complexity, and company. Basic cleaning (short, simple vents) runs $120-$160. Standard service (most homes) costs $160-$200. Complex or long vent systems (basement to roof, 20+ feet) cost $200-$250. Emergency same-day service adds $50-100. DIY cleaning costs $25-$60 for equipment but is only effective for simple, short configurations. Get quotes from 2-3 companies and verify what's included.
Can I clean my dryer vent myself?
DIY dryer vent cleaning is feasible for simple configurations: straight runs under 8 feet, single-story, easy access to both ends, no complex bends. You'll need a vent cleaning kit ($25-$45) and shop vacuum. However, Toronto homes often have challenging configurations - basement installations with vertical runs, multiple stories, long distances - that require professional equipment. DIY removes 60-75% of lint; professional cleaning removes 95-98%. For fire safety, professional cleaning is recommended annually even if you DIY between services.
How often should I clean my dryer vent?
Standard recommendation: every 12 months for moderate use (3-4 loads weekly). Heavy use (5+ loads weekly, large families) requires cleaning every 6 months. Light use (1-2 loads weekly) can extend to 18 months but inspect annually. Toronto factors affecting frequency: long vent runs (clean every 6-9 months), multiple bends (every 6-12 months), pet owners (every 8-12 months due to hair), winter usage increase (may require mid-winter cleaning). Clean immediately if you notice warning signs: clothes taking 2+ cycles, burning smell, excessive heat, or weak exterior airflow.
What are the signs my dryer vent is clogged?
Critical signs requiring immediate attention: burning smell during operation, visible smoke, excessive heat on dryer exterior, scorching on clothing. Urgent signs (clean within 1 week): clothes taking 2-3 cycles to dry (normal: 45-60 minutes), lint around door seal, no airflow from exterior vent, hot/humid laundry room during use. Maintenance-level signs: more than 12 months since cleaning, musty smell on clothing, dryer running longer than usual. Test exterior vent with tissue paper - should blow strongly during operation. If weak or no movement, vent is 70-90% blocked.
Can a clogged dryer vent cause a fire?
Yes. Clogged dryer vents cause 15,970 home fires annually in North America, resulting in $238 million in property damage and 13 deaths. Lint is highly flammable (ignites at 440-450°F). When vents are blocked, heat accumulates and dryer heating elements can reach 500°F+ (normal: 135°F). Lint in exhaust duct ignites and fire spreads through vent system to walls, attic, and structure. Failure to clean is the #1 cause of dryer fires (34%). Winter months (January-March) see 21% more dryer fires in North America. Regular cleaning prevents virtually all lint-related dryer fires.
Is flexible dryer vent safe?
No. Flexible foil or plastic dryer vents are fire hazards and prohibited by Toronto building code. Problems with flexible vents: ribbed interior traps lint 300% faster than smooth metal ducts, can crush easily creating complete blockages, plastic melts and foil burns in fires, sags and creates low points where lint accumulates. Only rigid metal (aluminum or galvanized steel) ductwork should be used. Semi-rigid aluminum is acceptable for last 6 feet between wall and dryer if rigid connection isn't feasible, but rigid metal is always preferred. If your Toronto home has flexible venting, replace it immediately - cost $150-$300 for professional installation.
Can dryer vent cleaning damage my dryer?
No. Professional dryer vent cleaning doesn't damage dryers when performed correctly by trained technicians. Reputable companies carry insurance and guarantee their work. The process involves disconnecting the vent, cleaning thoroughly, and reconnecting securely. Technicians inspect components during cleaning and identify potential issues before they cause problems. DIY cleaning can cause damage if ducts are forced apart, connections broken, or improper reassembly. To protect your dryer: hire certified professionals, verify licensing and insurance, get written warranty on work performed (typically 30-90 days), ensure all connections are properly secured after cleaning.
How long does professional dryer vent cleaning take?
Professional dryer vent cleaning takes 45-90 minutes depending on configuration. Simple, short vents (under 10 feet, easy access): 45-60 minutes. Standard Toronto homes (15-20 foot run, some bends): 60-75 minutes. Complex systems (basement to roof, 25+ feet, multiple floors): 75-90 minutes. Time includes: initial inspection and testing (10 min), dryer interior cleaning (15 min), vent duct deep cleaning (30-40 min), exterior vent service (10 min), final testing and documentation (10 min). Emergency service may be faster (focus on blockage removal) or slower (detailed inspection after fire risk situation).
Do I need special insurance for dryer fires?
Standard homeowners insurance covers fire damage including dryer fires. However, if fire is determined to result from negligent maintenance (failure to clean vent despite obvious warning signs, ignoring burning smell), insurance companies may reduce payout or deny claims. Protect your coverage: maintain cleaning records (save receipts from professional services), document regular maintenance, address warning signs immediately, don't operate dryer with known defects. In Toronto, insurance adjusters investigate fire causes - evidence of unmaintained dryer vents can affect claim outcomes. Annual professional cleaning costs $120-$250; average house fire causes $50,000-$200,000+ damage. Prevention is exponentially cheaper than fire recovery.
What happens during a dryer vent inspection?
Professional dryer vent inspection includes: visual examination of dryer exterior and connections, vent duct inspection (full length if accessible), measurement of current airflow with anemometer (CFM reading), temperature testing during operation, lint trap and housing inspection, interior dryer component check (heating element, blower, belt), exterior vent hood examination, ductwork material verification (should be rigid metal), measurement of vent run length and bend count, identification of code violations or safety hazards. Inspection typically takes 20-30 minutes, costs $75-$120 standalone (usually free with cleaning service). Technician provides written report with findings and recommendations.
Conclusion
Dryer vent cleaning is a critical home safety task that prevents 15,000 fires annually, saves energy costs, and extends appliance lifespan. For Toronto homeowners, the combination of long vent runs common in multi-story homes, increased winter usage, and aging housing stock creates elevated fire risk that makes regular professional cleaning essential rather than optional.
The investment in annual professional cleaning ($120-$250) is minimal compared to the potential consequences: house fires causing tens of thousands in damage, injury or loss of life, and insurance complications. Beyond fire prevention, clean vents reduce drying times by 40-60%, saving $18-$24 monthly in electricity and preventing premature dryer failure from overheating.
Recognize warning signs early - longer drying times, burning smells, and excessive heat indicate dangerous conditions requiring immediate attention. Don't wait for emergency situations. Schedule annual professional cleaning, perform monthly basic maintenance, and never ignore warning signs. Your family's safety and your home's protection depend on this simple but critical maintenance task.
Professional Dryer Vent Cleaning in Toronto
Protect your home and family with expert dryer vent cleaning from Nika Appliance Repair. Our certified technicians use professional rotary brush systems and high-powered extraction to remove 95-98% of lint buildup. We service all Toronto neighborhoods with same-day availability for emergency situations. Includes complete inspection, interior dryer cleaning, and detailed safety report.
Call (437) 524-1053 to Schedule Vent Cleaning