An inaccurate oven temperature is one of the most frustrating and costly appliance problems in any kitchen. When your oven runs 25°F too hot, your carefully prepared cookies burn before they're done. When it runs 30°F too cold, your chicken isn't fully cooked, creating food safety concerns. Temperature inaccuracy affects approximately 35% of ovens over 5 years old, leading to ruined meals, wasted ingredients, and cooking frustration.
At Nika Appliance Repair, we've diagnosed and fixed over 2,800 oven temperature issues across Toronto since 2017. Most temperature problems stem from failed temperature sensors (40% of cases), worn heating elements (28%), calibration drift (18%), or faulty control boards (14%). The good news: many temperature issues can be resolved through simple calibration adjustments you can perform yourself, while others require professional sensor or element replacement that we complete same-day with a comprehensive 90-day warranty.
Understanding Oven Temperature Accuracy
Modern ovens use sophisticated temperature control systems, but they're not perfect. Here's what you need to know about oven temperature accuracy:
Normal Temperature Variance
- Expected accuracy: Most quality ovens maintain temperature within ±10°F of the set point during normal operation
- Temperature cycling: Ovens don't maintain constant temperature - they cycle 15-25°F above and below the set point as elements turn on/off
- Hot and cold spots: Temperature varies by location inside the oven - back corners are typically 10-15°F hotter than the front center
- Preheat vs. cooking: Ovens may overshoot set temperature during preheat by 10-20°F before settling to correct temperature
- Calibration drift: All ovens gradually drift 5-15°F off calibration over 3-5 years as sensors age - this is normal wear
When Temperature Accuracy Becomes a Problem
Your oven needs calibration or repair when you experience:
- Consistent temperature errors: Oven consistently reads 20°F+ higher or lower than set temperature
- Excessive temperature swing: Temperature fluctuates more than 30°F during cooking cycle
- Uneven baking results: Food burns on one side while remaining undercooked on the other
- Extended cooking times: Everything takes significantly longer to cook than recipes indicate
- Failed baking tests: Simple tests like cookies or cakes consistently fail despite following recipes exactly
- Temperature won't stabilize: Oven never reaches or maintains set temperature after extended preheat
Toronto Climate Impact on Oven Temperature
Toronto's variable climate affects oven performance in specific ways:
- Winter challenges: Cold ambient air increases preheat time by 3-5 minutes and causes 5-10°F temperature drop when door opens
- Summer humidity: High humidity (65-85% in summer) accelerates temperature sensor corrosion, reducing accuracy by 15-20%
- Temperature extremes: Toronto's -20°C to +35°C annual range stresses oven components, causing sensors to fail 40% more frequently than moderate climates
- Basement vs. main floor: Ovens in cooler basements require 2-3 minutes longer preheat and may read 5-8°F low in winter
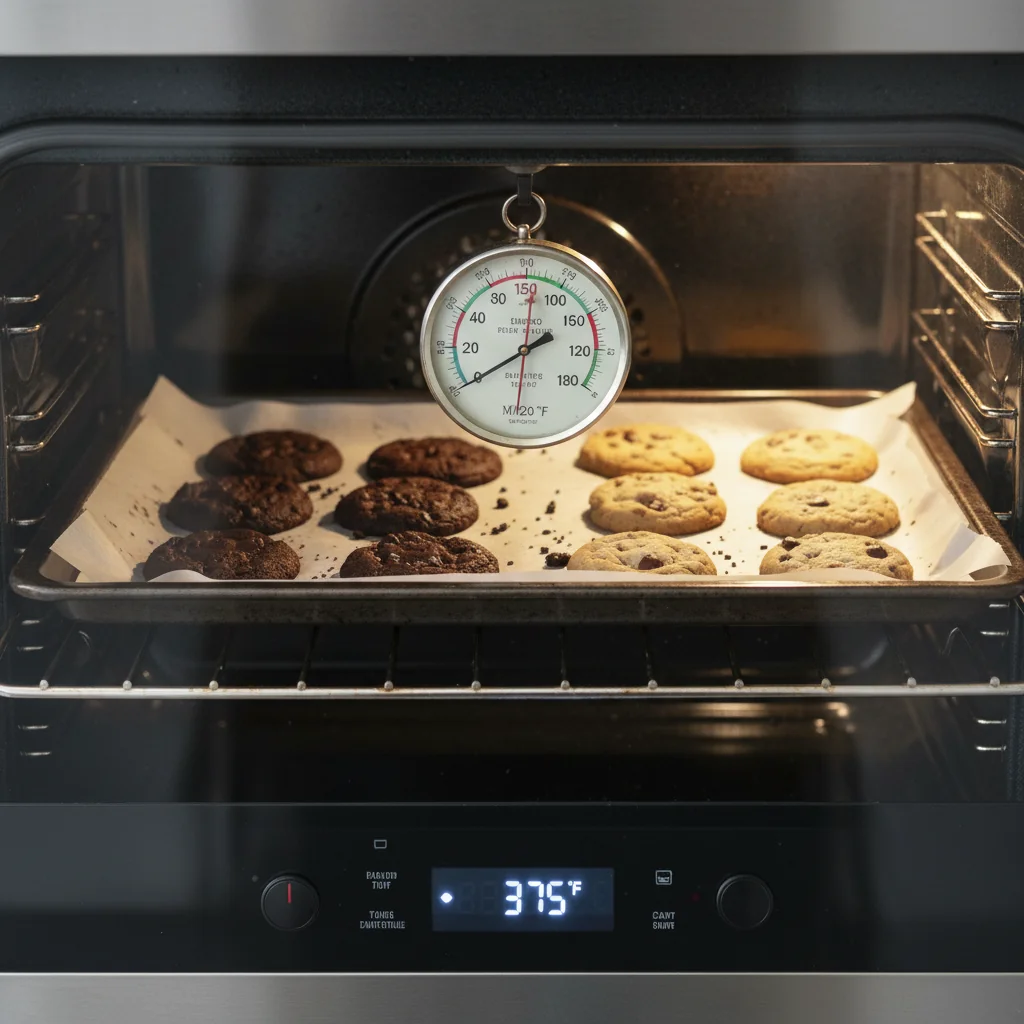
How to Test Oven Temperature Accuracy
Accurate temperature testing requires the right equipment and methodology. Here's our professional approach:
Equipment You'll Need
- Oven thermometer: Use calibrated dial or digital thermometer ($15-35) - avoid cheap hanging thermometers that touch oven walls
- Multiple thermometers recommended: Using 2-3 thermometers helps identify faulty thermometers vs. oven problems
- Timer or smartphone: For tracking temperature stabilization time
- Notepad: Record temperatures at multiple set points for pattern identification
Step-by-Step Temperature Testing Procedure
Step 1: Position Thermometer Correctly
- Place thermometer in center of middle rack, away from walls and elements
- Don't let thermometer touch oven walls, racks, or heating elements
- If using multiple thermometers, space them evenly across the rack
Step 2: Preheat to 350°F
- Set oven to 350°F (most common cooking temperature)
- Wait for preheat signal/beep indicating oven is "ready"
- Wait an additional 15-20 minutes after preheat signal for temperature to stabilize
- Oven cycles 15-25°F during this period - you need the average temperature
Step 3: Record Temperature Reading
- Quickly open oven door, read thermometer, and close door immediately
- Note the temperature shown on your thermometer(s)
- Record the difference from 350°F set point (e.g., "345°F - 5° low" or "375°F - 25° high")
Step 4: Repeat at Multiple Temperatures
- Test at 250°F (low roasting temperature)
- Test at 450°F (high baking/roasting temperature)
- Different temperatures reveal whether error is consistent or varies across temperature range
- Consistent errors across all temperatures suggest calibration issue or sensor failure
- Varying errors suggest heating element problems or control board issues
Interpreting Your Temperature Test Results
Temperature off by 5-15°F consistently: Normal calibration drift - simple calibration adjustment will fix this (DIY or professional service $95-150)
Temperature off by 20-50°F consistently: Failed temperature sensor/thermostat - requires professional replacement ($180-260)
Temperature off by different amounts at different settings: Heating element weakness or control board issue - professional diagnosis needed ($95 diagnostic + $220-450 repair)
Temperature wildly fluctuates (±40°F+ swings): Failed control board or malfunctioning relay - requires professional repair ($280-450)
Oven won't reach temperature: Heating element failure, ventilation blockage, or door seal problem - professional assessment required ($140-320 depending on cause)
DIY Oven Calibration Methods
If your oven is consistently off by 5-35°F, you can likely calibrate it yourself. Most modern ovens allow temperature offset adjustment through the control panel:
Electronic Control Panel Calibration (Most Common)
Generic calibration process (varies by brand):
- Turn oven off completely
- Press and hold "Bake" button for 6-10 seconds until display shows calibration mode (often "0" or "CAL")
- Use "+" and "-" buttons to adjust temperature offset (typically ±35°F maximum)
- If oven reads 25°F too low, enter "+25" to add 25°F to all temperatures
- If oven reads 25°F too high, enter "-25" to subtract 25°F from all temperatures
- Press "Start" or "Save" to confirm adjustment
- Retest with oven thermometer to verify accuracy
Brand-specific calibration instructions:
Whirlpool/KitchenAid/Maytag:
- Press and hold "Custom Broil" and "Custom Cook" simultaneously for 3 seconds
- Display shows "0°F" - use number pad to enter offset
- Maximum adjustment ±35°F
- Press "Start" to save
GE/Hotpoint:
- Press "Bake" and "Broil Hi/Lo" together for 3 seconds
- Display shows current offset
- Use "+" and "-" to adjust (±35°F range)
- Press "Start" to confirm
Samsung:
- Access Settings menu on touchscreen
- Select "Oven Temp Adjust" or "Temperature Calibration"
- Enter offset value (±35°F typical range)
- Some Samsung models don't allow user calibration - requires service mode access
LG:
- Press "Start" button and hold for 3 seconds
- Display shows "Ajust" or calibration mode
- Use number pad to enter offset
- Press "Start" to save
Bosch:
- Press "Setup" or "Settings" button
- Navigate to "Temperature Calibration"
- Adjust in 5°F increments (±35°F range)
- Confirm and exit settings
When DIY Calibration Won't Work
Calibration only fixes consistent temperature offsets. It cannot fix:
- Temperature that varies widely: If oven swings ±40°F+ during cooking, you have control board or relay issues
- Different errors at different temps: If low at 250°F but high at 450°F, heating elements are failing
- Errors beyond ±35°F: Most ovens limit calibration to ±35°F - larger errors indicate sensor or element failure
- Temperature won't stabilize: If oven never settles to consistent temperature, components are failing
- Older mechanical controls: Ovens with manual dial controls (pre-2000) require thermostat replacement, not calibration
Mechanical Thermostat Calibration (Older Ovens)
Ovens with manual temperature dials (common pre-2000) use mechanical thermostats that can be physically adjusted:
- Pull temperature dial off the shaft (may require small screwdriver to release set screw)
- Behind dial, locate small adjustment screws on thermostat shaft
- Turn adjustment screw 1/8 turn clockwise to raise temperature
- Turn counterclockwise to lower temperature
- Typically 1/8 turn = 10-15°F adjustment
- Reassemble and retest
Warning: Mechanical thermostat adjustment is challenging and can make problems worse if done incorrectly. For ovens over 15 years old, thermostat replacement ($200-280) is often more reliable than attempted adjustment.
For detailed oven repair guidance specific to Toronto homes, see our comprehensive oven repair Toronto guide.
Calibration Not Fixing Your Oven Temperature?
You likely need sensor or element replacement. We diagnose and repair same-day with genuine parts and 90-day warranty!
Call (437) 524-1053Heating Element Problems and Solutions
Heating elements are the second most common cause of oven temperature problems (28% of our service calls). Here's how to identify and address element issues:
Signs of Failing Heating Elements
- Visual inspection: Elements should glow evenly bright orange/red when operating - dark spots or sections indicate failure
- Blistering or cracking: Physical damage to element casing prevents even heat distribution
- Uneven baking: Food burns on one side while remaining undercooked indicates element weakness or failure
- Extended preheat times: If oven takes 15+ minutes to preheat to 350°F, elements may be weak
- Temperature won't reach set point: Oven stops heating at 250°F when set to 350°F indicates complete element failure
- Broil works but bake doesn't (or vice versa): Confirms specific element failure
Testing Heating Elements
Visual test (safe for DIY):
- Set oven to 450°F
- Observe bake element (bottom) - should glow evenly bright orange within 5 minutes
- Observe broil element (top) - should glow evenly when broiler is activated
- Dark sections, uneven glow, or no glow indicates failure
Electrical test (requires multimeter - professional recommended):
- Turn off power at breaker (critical safety step)
- Access element by removing oven racks and unscrewing element from rear wall
- Disconnect wires from element terminals
- Set multimeter to ohms resistance mode
- Touch probes to element terminals
- Bake elements should read 15-50 ohms (varies by wattage - consult specifications)
- Infinite resistance (no reading) indicates open element - failed and must be replaced
- Zero resistance indicates shorted element - dangerous condition requiring immediate replacement
Heating Element Replacement Costs
| Element Type | DIY Parts Cost | Professional Service | Difficulty |
|---|---|---|---|
| Bake Element (Bottom) | $40-80 | $220-280 | Moderate DIY |
| Broil Element (Top) | $35-70 | $200-260 | Easy DIY |
| Convection Element | $60-120 | $280-360 | Complex - Professional |
| Hidden Bake Element | $80-150 | $320-420 | Complex - Professional |
When to Replace vs. Repair Heating Elements
Consider professional element replacement when:
- Working with 240V electricity makes you uncomfortable - shock risk is serious
- Hidden bake element requires oven disassembly to access
- Convection element replacement requires removing rear oven panel and disconnecting fan
- You want warranty protection - our 90-day warranty covers parts and labor
- Oven is still under manufacturer warranty - DIY voids remaining coverage
DIY element replacement appropriate when:
- Element is easily accessible (standard bake/broil elements with visible mounting screws)
- You're comfortable working with 240V power and can verify power is off at breaker
- Oven is out of warranty (typically 1 year for most brands)
- You have correct replacement element (match model number exactly)
Temperature Sensor and Thermostat Failures
Temperature sensor failure is the leading cause of oven temperature inaccuracy (40% of our service calls). Here's what you need to know:
Understanding Oven Temperature Sensors
Modern ovens use electronic temperature sensors (RTD - Resistance Temperature Detector) that change electrical resistance based on temperature. The control board reads this resistance and adjusts element cycling to maintain set temperature.
Common sensor failure modes:
- Sensor drift: Gradual change in resistance-temperature relationship causes consistent temperature offset (most common)
- Sensor short: Internal short circuit causes wildly inaccurate readings or error codes
- Sensor open: Complete failure prevents temperature reading, oven won't heat or shows F1/F3 error codes
- Connector corrosion: Poor electrical connection at sensor terminal causes intermittent temperature problems
- Physical damage: Sensor bulb damaged by cleaning or contact causes erratic temperature readings
Diagnosing Temperature Sensor Problems
Symptoms indicating sensor failure:
- Temperature consistently off by 20-50°F despite calibration attempts
- Error codes F1, F3, F7, or F10 (varies by brand - check owner's manual)
- Oven cycles excessively - turns on and off every 30-60 seconds
- Temperature reading on display doesn't match thermometer reading by 30°F+
- Oven won't heat at all but control panel functions normally
Testing temperature sensor (requires multimeter):
- Turn off power at breaker
- Locate temperature sensor - typically visible inside oven, mounted to upper rear wall
- Access sensor wiring by removing rear lower panel or control panel
- Disconnect sensor wiring at connector
- Set multimeter to ohms resistance mode
- Touch probes to sensor terminal pins
- At room temperature (70°F), sensor should read 1,050-1,150 ohms (standard RTD spec)
- Resistance outside this range or no reading indicates failed sensor
Temperature Sensor Replacement
Replacement costs:
- DIY parts cost: $25-60 for OEM sensor
- Professional replacement: $180-260 including sensor, labor, and testing
- Time required: 45-90 minutes for complete replacement and verification
Professional replacement recommended because:
- Requires accurate diagnosis - other issues (control board, wiring) mimic sensor failure
- Sensor must be positioned precisely - improper placement causes continued inaccuracy
- Some sensors require control board reprogramming after installation
- Professional service includes complete temperature testing and calibration verification
- 90-day warranty protects against misdiagnosis or installation errors
Older Ovens: Mechanical Thermostat Systems
Ovens manufactured before 2000 typically use mechanical thermostats instead of electronic sensors. These capillary tube systems sense temperature through gas expansion:
Thermostat failure symptoms:
- Temperature varies more than 50°F from set point
- Temperature dial feels loose or spins freely
- Oven overheats to dangerous levels (450°F+ when set to 350°F)
- Oven won't reach temperature despite elements glowing
Mechanical thermostat replacement:
- Parts cost: $80-150 for OEM thermostat
- Professional service: $200-280 complete
- Complexity: Requires bulb positioning inside oven and capillary tube routing - professional service strongly recommended
Toronto Humidity and Sensor Failure
Toronto's humid summers significantly impact oven temperature sensor longevity:
- Corrosion acceleration: 65-85% summer humidity causes terminal corrosion 40% faster than dry climates
- Sensor lifespan reduction: Expected 12-15 year sensor life reduced to 8-10 years in humid Toronto environments
- Preventive measures: Run ventilation fan during oven use, avoid water contact during cleaning, inspect terminal connections annually
- Basement installation: Ovens in high-humidity basements experience sensor failure 50% more frequently
Other Causes of Temperature Inaccuracy
Beyond sensors and elements, several other factors affect oven temperature accuracy:
Door Seal Problems
Worn or damaged door gaskets allow heat to escape, causing temperature loss and longer cooking times:
- Visual inspection: Check rubber gasket around door for tears, compression, brittleness, or gaps
- Dollar bill test: Close door on dollar bill - should have significant resistance when pulled. Loose bill indicates poor seal
- Temperature impact: Poor door seal can reduce temperature 15-30°F and extend cooking times 20-30%
- Replacement cost: $140-200 for professional seal replacement including proper gasket adhesion
Control Board Failures
The main control board interprets sensor readings and controls element cycling. Board failures cause:
- Erratic temperature behavior: Wild temperature swings, unexpected shutoffs, or runaway heating
- Error codes: F1-F10 error codes often indicate control board communication failures
- Unresponsive controls: Buttons don't respond, display malfunctions, or settings don't save
- Relay failures: Elements won't turn on/off properly causing temperature cycling problems
- Replacement cost: $280-450 for control board replacement depending on model complexity
Convection Fan Issues
Convection ovens rely on fan circulation for even temperature distribution:
- Fan motor failure: No air circulation creates hot/cold spots and uneven baking
- Fan blade damage: Bent or broken blades reduce air movement
- Bearing wear: Noisy fan operation indicates bearing failure and reduced performance
- Temperature sensors: Convection ovens have additional sensors that can fail
- Repair costs: Fan motor replacement $240-340, sensor replacement $180-260
Ventilation and Installation Problems
Proper ventilation is critical for accurate oven operation:
- Blocked vents: Debris in oven vents prevents proper air circulation and heat regulation
- Inadequate clearance: Insufficient cabinet spacing causes overheating and thermal shutdown
- Improper voltage: 240V ovens receiving 208V (common in condos) heat 15-20% slower
- Loose wiring connections: High-resistance connections reduce power delivery
When you need immediate help with oven problems, our same-day appliance repair service ensures your oven is back to accurate temperature within hours.
Complex Temperature Problem? We'll Diagnose It Right.
Not sure if it's sensor, element, or control board? Our $95 diagnostic includes comprehensive testing and written estimate. Call now!
Call (437) 524-1053Frequently Asked Questions
How do I know if my oven temperature is accurate?
Use an oven thermometer to test accuracy. Preheat to 350°F, wait 20 minutes, then check the thermometer reading. If it differs by more than 15°F from the set temperature, your oven needs calibration or repair. Most ovens should maintain temperature within ±10°F of the set point.
Can I calibrate my oven temperature myself?
Yes, most modern ovens allow temperature calibration through the control panel. Typically you can adjust ±35°F by accessing calibration mode (consult your owner's manual for specific button sequences). However, if calibration doesn't fix the problem or your oven lacks this feature, professional repair of the thermostat or temperature sensor is needed.
Why is my oven temperature inaccurate?
Common causes include: failed temperature sensor/thermostat (most common, $180-260 repair), worn heating elements ($220-320 replacement), faulty control board ($280-450 repair), poor door seal ($140-200 fix), or simple calibration drift. In Toronto's variable climate, temperature sensors fail 40% more frequently due to humidity fluctuations.
How much does oven calibration cost?
DIY calibration through control panel settings is free. Professional calibration service costs $95-150. If repairs are needed: temperature sensor replacement $180-260, heating element $220-320, thermostat $200-280, or control board $280-450. Most repairs are completed same-day with a 90-day warranty.
What's the best oven thermometer for testing temperature?
For accurate testing, use a calibrated dial or digital oven thermometer ($15-35). Position it in the center of the middle rack. Avoid hanging thermometers that touch the oven walls. Premium options like ThermoWorks or Taylor offer ±2°F accuracy. Test at multiple temperatures (250°F, 350°F, 450°F) for comprehensive assessment.
How often should ovens be calibrated?
Check oven temperature accuracy annually, or immediately if you notice: uneven baking, longer cooking times, burnt or undercooked food, or temperature fluctuations. Ovens naturally drift 5-15°F over 3-5 years due to sensor aging. Professional calibration during annual maintenance prevents cooking problems.
Conclusion: Get Your Oven Temperature Right
Accurate oven temperature is essential for successful cooking and baking. Whether your oven needs simple calibration adjustment, temperature sensor replacement, heating element repair, or control board service, addressing temperature problems quickly prevents ruined meals and wasted ingredients.
At Nika Appliance Repair, we've specialized in oven temperature diagnosis and repair across Toronto for over 8 years. Our technicians carry calibrated testing equipment, genuine OEM sensors and elements, and have the expertise to diagnose complex temperature problems accurately the first time. We understand how Toronto's climate affects oven performance and provide preventive guidance to extend your oven's accurate operation.
Whether you need professional calibration service, sensor replacement, element installation, or just aren't sure what's causing your temperature problems, we provide same-day service with transparent pricing and a comprehensive 90-day warranty. Don't continue struggling with inaccurate oven temperatures - call Nika Appliance Repair and get back to cooking with confidence.
Fix Your Oven Temperature Today - Same-Day Service Available
Expert diagnosis • Genuine parts • 90-day warranty • Call now for accurate temperature tomorrow!
Call (437) 524-1053